A little off the norm, but this is going to take a look at the mechanics of frustum culling and a practical application in Maya. For anyone unfamiliar with the concept, frustum culling is the process of determining what objects are within the render view, usually prior to rendering to reduce the amount of computation required, but it has a lot of practical uses. We’ll take a look at the theory and why it works, and then follow it up with putting it in practice in Maya.
Theory
There are a few ways to check whether something is in the render view. The most accurate method would of course be to check every vertex, but that’s far too intensive. To simplify it, we could just check the corners of the bounding box. It runs the risk of including meshes that aren’t actually in view, but whose bounding boxes clip the frustum, but there’s another issue with this — what happens to boxes that cross the frustum, but don’t have any vertices in view?
We’re going to need to look at intersections, but due to the skewed shape of the frustum, normal bounding box intersections aren’t going to work. Instead, we’ll build the 6 planes that make up the shape, and check whether any corner of the object is in the positive half of each. If this method fails for any plane, there is no intersection. See the image below for how this works on boxes that don’t even have a point inside the frustum.

This is very easy to do by using the parametric form of a plane:
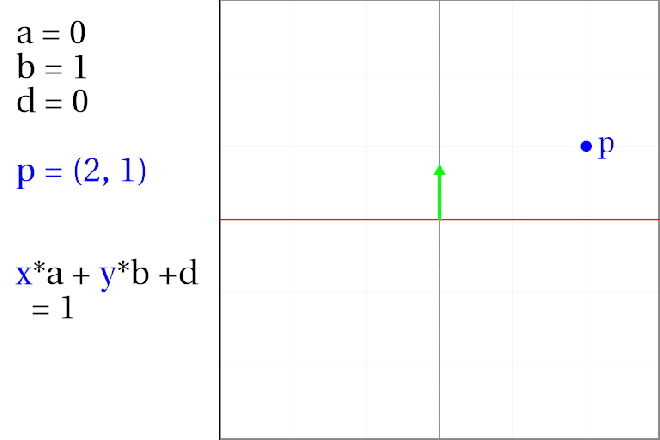
ax + by + cz + d = 0
where (a, b, c) is the normal or up direction of the plane, d is the distance from the origin, and (x, y, z) is any 3D point in space. If the putting those values into the equation is equal to 0, then the point (x, y, z) is on the plane. The important thing to note here is that this is an infinite plane, not a polygon. With a distance value of 0, that means the plane runs through the origin, and by increasing the distance we’re simply pushing it further away in the direction of it’s normal.
This method also makes it extremely simple to compare what side of a plane a position is on. The dot product of two vectors tells us whether they point in the same direction, are perpendicular or away from each other, ie, what half of the space they are in. You’ll notice that ax + by + cz is just the dot product of two vectors, and the addition of the distance is the same as bringing the plane’s normal back to origin, making it a an accurate comparison for any vector. Now if we take any point, we can tell which side of each plane it’s on.
So how do we build the planes for the frustum? You might initially think to go with the obvious approach — calculate the eight corners using the camera’s settings, get the edge directions, and use cross products to get the normals — but there is a much, much easier way.
Enter our old friend, the projection matrix.
Whenever anything is rendered from 3D space to 2D space, it is converted through clip space. Clip space is actually a 3D cube, that fits each value in a given range which can be easily sorted by depth and mapped to screen. This means, that the projection matrix is already a mapping from a cube with known planes, to the camera’s object space frustum. This means we can actually pull the plane data from this. We can take it one step further and multiply this matrix by the inverse transformation matrix of the camera to get our planes in world space. So how does this work?
Let’s take a quick look at what makes up a matrix.
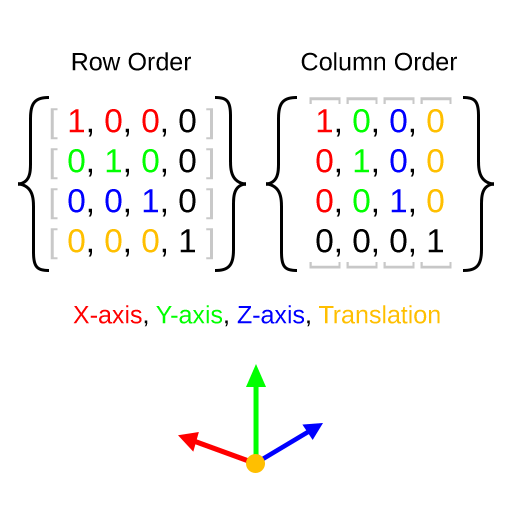
As you can see from the image above, the matrix is composed of very distinct components – the three normal directions for each axis, and a position in space. It’s important to know what type of matrix you’re working with so that you are sure to call the correct values, we’ll see this in the Maya example below.
A projection matrix is a mapping from an object space frustum (or world space if we multiplied it by the inverse transformation) to a cube (clip space) at origin, meaning that if we add/deduct the translation from each axis, we’ll get a vector pointing towards each face. Similarly, the distance is the final value added to/deducted from the final value of the axis. It’s important to note that these aren’t normalised, meaning we won’t be able to get accurate world space measurements unless we normalise the vector and the distance value. However, we won’t need to normalise for our checks as the dot product projection of our test point and the plane normal will match the scale of the distance value, meaning we’ll still get accurate results.
Finally, we need to know what points to check against our new plane values. As we got our frustum planes in world space, we can work directly with the values of the objects we’re checking against. As previously mentioned, we’ll want to check against the bounding boxes, and all we need to know is that at least one of the corners is in the positive half of the plane. We could check all eight corners, but because bounding boxes are axis aligned, we can save ourselves a lot of work by pre-determining which corner is furthest away and only checking against that one.
A normal is made of x, y and z values, and whether they are positive or negative decides whether they are pointing to the minimum or maximum end of the bounding box. As a result, we can use this to pick exactly the values of the bounding box corner which is furthest away like so:
# Bounding box is defined by two points, eg, [(-1, -1, -1), (1, 1, 1)]
limits = [bbox.min, bbox.max]
# Negative points to the minimum, Positive to the maximum
index_x = int(plane.normal.x > 0)
index_y = int(plane.normal.y > 0)
index_z = int(plane.normal.z > 0)
# Take the corresponding value from each point to build the corner point
point = (limits[index_x].x, limits[index_y].y, limits[index_z].z)
Now we have two very simple methods that give us the frustum planes, and means we only have to check one vertex per object, making this a very fast and efficient system.
Maya Example
So let’s take a quick look at a practical example of this in Maya. We’ll use it’s Python API 2.0 (maya.api.OpenMaya) to build this, as it’s far more efficient than regular python, but a lot easier to work with than C++.
First thing we’ll need is a class to define our parametric plane:
class Plane(object):
    def __init__(self, a, b, c, d):
        self.normal = OpenMaya.MVector(a, b, c)
        self.distance = d

    def normalise(self):
        length = self.normal.length()
        self.normal /= length
        self.distance /= length

    def is_in_front(self, point):
        return point * self.normal + self.distance > 0
This should make sense with what was explained above, we initialise it with the four values we get from our projection matrix, and can check whether a point is in “front” of the plane, ie, in the positive half, by checking whether the parametric equation ax + by + cz + d returns a positive value (Note: a value of 0 means the point is on the plane, but, as we’re certain that we’re checking the point that is furthest from the plane we know that in this case the entire box is behind it, meaning we can safely cull it. If we were intending to use this for non axis-aligned bounding boxes, this should read >=). While we don’t need to normalise the values, I left the function in to show what would be needed if we did want to.
Now to build the frustum:
class Frustum(object):
    def __init__(self, camera_name):
        selection_list = OpenMaya.MSelectionList()
        selection_list.add(camera_name)
        cam_dag_path = selection_list.getDagPath(0)
        self.camera = OpenMaya.MFnCamera(cam_dag_path)

        world_to_cam = OpenMaya.MFloatMatrix(cam_dag_path.inclusiveMatrixInverse())
        projection = self.camera.projectionMatrix()
        post_projection = self.camera.postProjectionMatrix()

        # MFloatMatrix = [x-axis, y-axis, z-axis, translate]
        view_projection = world_to_cam * projection * post_projection

        # Right = translate - x-axis
        self.right = Plane(
            view_projection[3] - view_projection[0],
            view_projection[7] - view_projection[4],
            view_projection[11] - view_projection[8],
            view_projection[15] - view_projection[12],
        )

        # Left = translate + x-axis
        self.left = Plane(
            view_projection[3] + view_projection[0],
            view_projection[7] + view_projection[4],
            view_projection[11] + view_projection[8],
            view_projection[15] + view_projection[12],
        )

        # Bottom = translate + y-axis
        self.bottom = Plane(
            view_projection[3] + view_projection[1],
            view_projection[7] + view_projection[5],
            view_projection[11] + view_projection[9],
            view_projection[15] + view_projection[13],
        )

        # Top = translate - y-axis
        self.top = Plane(
            view_projection[3] - view_projection[1],
            view_projection[7] - view_projection[5],
            view_projection[11] - view_projection[9],
            view_projection[15] - view_projection[13],
        )

        # Far = translate + z-axis
        self.far = Plane(
            view_projection[3] + view_projection[2],
            view_projection[7] + view_projection[6],
            view_projection[11] + view_projection[10],
            view_projection[15] + view_projection[14],
        )

        # Near = translate - z-axis
        self.near = Plane(
            view_projection[3] - view_projection[2],
            view_projection[7] - view_projection[6],
            view_projection[11] - view_projection[10],
            view_projection[15] - view_projection[14],
        )

        self.planes = [self.right, self.left, self.bottom, self.top, self.far, self.near]
Note: Do not try to draw these normals in the viewport to compare them to the Maya display of the frustum as you’ll see a fairly large discrepancy on the vertical bounds. I am not sure yet whether this is a bug in Maya’s draw, or whether it is displaying a different bounds, but the values obtained with this method are accurate and do mark the limits of what is rendered to screen.
Taking the name of the camera we want to build, we get the camera object and determine the total model view matrix we want to compare against. In this case, we’re using the inverse transformation matrix of the camera to map our frustum in world space and not just object space. In Maya, there is also a post projection matrix that can be used to alter the final render, and should be taken into account. Remember, the order of matrix multiplication is important.
You should also note that OpenMaya’s MFloatMatrix stores it’s values in a flat list, meaning we’ll need our indices from 0-15.
And finally, the intersection function:
def intersects(self, bbox):
    limits = [bbox.min, bbox.max]

    for plane in self.planes:
        # The corner furthest in normal direction of plane
        index_x = int(plane.normal.x > 0)
        index_y = int(plane.normal.y > 0)
        index_z = int(plane.normal.z > 0)
        point = OpenMaya.MVector(limits[index_x].x, limits[index_y].y, limits[index_z].z)

        # If this corner is not in front, none are, bbox is out of view
        if not plane.is_in_front(point):
            return False

    return True
It should be worth noting that a bounding box in maya is by default in object space, and that we would need to convert it to world space to get an accurate result.
Conclusion
In the end, frustum culling boils down to some very simple methods. Of course, there are a lot of ways to expand on this, for example, if you were comparing to oriented bounding boxes (something which is not natively supported in Maya). It would also be worth storing your combined projection matrix so that you could easily check whether any specific vertex was in render view.
I hope this helps someone else out there make a little more sense of how this works, it’s certainly not an easy concept to get first try!

Hello, this looks cool, i am slowly working my way through and refreshing my vector math. One question though, in the def def
intersects(self, bbox):
what is the bbox argument? such that we can call
limits = [bbox.min, bbox.max]
ie where do you get the bbox object that has a “.min” and “.max” member?
thanks in advance
LikeLike
Good question! Every geometry in maya has a bounding box object which is it’s min and max points for an axis aligned cube. Using maya’s OpenMaya api, you can extract the bounding box you’d need for this check using:
def get_bounding_box(obj_name):
selection_list = OpenMaya.MSelectionList()
selection_list.add(obj_name)
obj_dag_path = selection_list.getDagPath(0)
obj_dag_node = OpenMaya.MFnDagNode(obj_dag_path)
matrix = obj_dag_path.exclusiveMatrix()
bbox = obj_dag_node.boundingBox.transformUsing(matrix)
return bbox
The bounding box is just a property of the MFnDagNode, but as mentioned in the article, bounding boxes are in object space by default, so this is mapping it into world space before returning it.
LikeLike