Unfortunately I’m low on spare time at the moment, but development is still progressing! Here’s a quick sneak peak at what I’m currently working on, a water simulator and renderer for nuke:
Nuke Water Renderer from Matthew “Rick” Shaw on Vimeo.
Unfortunately I’m low on spare time at the moment, but development is still progressing! Here’s a quick sneak peak at what I’m currently working on, a water simulator and renderer for nuke:
Nuke Water Renderer from Matthew “Rick” Shaw on Vimeo.
At last, something exciting! This is a tool that admittedly, might not have a huge amount of use, but does have some fun features to play with. I’ve developed a set of nodes for generating, filling, lighting and rendering voxel grids in Nuke. You may also notice a new link above to a documentation page for the new nodes, as it includes quite a lot and could be confusing to use without a bit of an explanation.
The tool is available for download here on nukepedia.
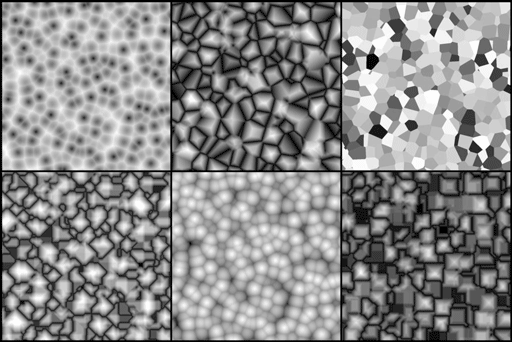
There’s a few types of noise that are missing from Nuke, and this one really bugged me. Worley noise in particular can be quite useful, and there are so many variations of cell noise that can be built from the same core mechanics that it seemed like a good one to begin with.
This got pushed by the wayside a little as a number of other tools took up more time, but I’ve finally gotten it to a suitable standard to release it. There are a number of improvements and optimizations I plan to add over the coming days, but at the moment it’s pretty useful as is! The premise is simple: Effects can be saved out as 2D image sequences, and read in to render out 3D particle effects with considerable speed and easy customization.

I’ve almost finished a useful tool, but there’s quite a lot to it so I’ve decided to split this into two parts. In this first part I’ll go over the core mechanic of the tool and something that a lot of people seem to have difficulty with, building a renderer. Sadly, not a full renderer, just a way of converting 3D points to 2D screen space.
In order to understand the code, we’ll need to do a quick little crash course in how rendering works. I’ll try keep it simple and short, but if you already know or simply want to see the Particle Stock code, skip on Part 2 (as soon as it’s up!).
The process is done in the following steps:
This is mostly done using matrix math. Matrices can be daunting at first but are actually quite simple. If you want a detailed breakdown on how all of this works, I highly recommend the scratchapixel explanation. The simple version is that matrices store the rotation, scale and translation of a point in one easy to use form. These are known as affine transformations, which means they are linear and preserve straight lines resulting in orthographic views. These are what we use to move objects around in 3D space, and is where we begin step 1.
Continue reading “Particle Stock – Part 1 : Building a Renderer”
This is an utterly boring tool. Let’s face it, who cares about drawing straight lines? And yet, there are many times when you need to do a simple shape or two, perhaps some motion graphics, and you have to dust of the After Effects you thought you’d left behind when you found the joys of nuke. No more! (Well, unless you need something other than lines…)
This little node can draw all the lines you want, as well as animate it being drawn, dash the lines, tweak the spacing and softness etc… There’s still a couple of oddities in it that I’ve yet to go back and tidy up, but I’m long overdue a post and it’s tidy enough to be worth putting out there for now.
Nuke is great, but it doesn’t always have what you want. For those coming from After Effects to Nuke, this is one of the tools you may be missing, the Beam. Simply specify a start and end position, animate the time and watch it shoot across your screen. The handy benefit of it over say, a roto paint, is that it can easily fake 3D movement at the press of a button. I made the tool to have the exact same settings as the AE version, so hopefully there should be no confusion.
The Lens Distortion node in Nuke can be quite heavy as it comes with a host of features which although useful, are often unneeded. If you want a quick and dirty lens distortion, then here is a convenient alternative. Nothing flashy, just a slider for the amount and a choice between barrel or pincushion. Simple.

This is more of an exercise in learning the limitations of blink script than a functional tool, although it does have some useful alterations and allows for a lot of customisation. The end result is a way of using Point Position and Normals renders to relight an image with a choice of point or spotlight. Directional is easily achieved using these same methods but is not currently part of the script. It will likely be added in future updates.

